Monday, November 26, 2012

Mississippi Mud Pie with Homemade Whipped Cream

So I was commissioned to make a chocolate pudding pie (whatever that is) for our Thanksgiving potluck. I've never done that before, but I was pretty sure Martha Stewart wouldn't let me down so I decided to go for it. I found this delicious recipe from Martha's website, and it looked a lot more gourmet than just a chocolate pudding pie. It was inhaled at dessert!


Mississippi Mud Pie with Homemade Whipped Cream

25 chocolate wafer cookies (~1/2 a 9 oz package; we used Oreos with the cream scraped off)
1/2 C pecan halves, plus some for garnish
4 tbsp unsalted butter, melted, plus 2 tbsp cold, cut into small pieces
2/3 C plus 1 tsp sugar
1/3 C unsweetened cocoa powder
1/3 C cornstarch
1/4 tsp salt
2 1/2 C milk
4 large egg yolks
2 tsp pure vanilla extract, divided
1/2 C heavy cream

1. Preheat oven to 375°F. In food processor, grind cookies and pecans to fine crumbs. Add melted butter and process until moistened.
2. Transfer mixture to 9" pie plate, pressing into bottom and up sides into crust shape. Bake until fragrant, about 8-10 minutes. Cool.
3. Place large, fine-mesh sieve over a large bowl and set aside. In medium saucepan, off heat, whisk together 2/3 C sugar, cocoa powder, cornstarch, and salt. A few tbsp at a time, whisk in milk. Whisk in egg yolks.
4. Over medium heat, WHISKING CONSTANTLY, cook mixture until first large sputtering bubble forms. (It took 5-10 minutes or so, but you'll know exactly when this moment is because all of the sudden, out of nowhere, what was a thin mixture has morphed into perfect chocolate pudding!)
5. Reduce heat to low and cook for 1 minute, still WHISKING CONSTANTLY.
6. Remove from heat and immediately pour through sieve into waiting bowl. Stir in 1 tsp vanilla and 2 tbsp cold butter chunks.
7. Pour pudding into crust. Place plastic wrap directly on surface of pudding to prevent a skin from forming. Chill at least 2 hours.
8. Just before serving, beat cream, 1 tsp sugar, and 1 tsp vanilla until soft peaks form. Spread whipped cream over pudding and sprinkle with pecans.

Enjoy! This was a really fun and gratifying recipe to make... it was super quick (even the baking is only for the crust), really easy, and delectable!

Thursday, November 15, 2012

Blackened Chicken and Cilantro Lime Quinoa with Avocado Cream Sauce

This is an incredibly healthy and AMAZINGLY delicious recipe! (The post seems kind of long and scary, but trust me, it's super easy and QUICK; it took me less than 45 minutes to whip this up; it's totally worth it). I found it at the Sarcastic Cooking website, and adapted it a little bit based on what I had available. It was my first attempt at making quinoa and I have to say, it's a little weird.  But I like it... I think. I know it's SUPER healthy, and it has an interesting texture that I think can be pretty versatile if I can just get creative and branch out a little.  Anyway, this particular recipe was fantastic and the chicken seasoning is incredible... I'll definitely be using it again.  Maybe for fajitas?


Blackened Chicken and Cilantro Lime Quinoa with Avocado Cream Sauce

Chicken
1/2 tsp paprika
1/4 tsp salt
1/4 tsp pepper
1/4 tsp cayenne pepper
1/4 tsp onion powder
1/4 tsp cumin (I used WAY less than this, because cumin is a little overpowering for my taste)
2 boneless skinless chicken breasts
1 tsp olive oil (I used a little more)

Quinoa
2 C chicken stock
1 C quinoa
juice and zest from 1 lime
dash of salt and pepper
olive oil
2 tbsp cilantro, chopped (I ran out, so I used parsley instead; it was SO GOOD)

1. Combine all dry seasonings in a small bowl (I'd make a little more than it calls for because the seasoned/blackened part of the chicken is so amazing that it'd be nice to have more of it). Mix them together and season both sides of each chicken breast.
2. Add the olive oil to large skillet and heat over medium/high heat for a minute. Add chicken breasts and cook for 7 minutes on each side (I cooked them a little longer; just cut into the chicken and when it's done, quit cooking) with the lid on.
3. Remove chicken from pan and cool several minutes before slicing.
4. Put chicken stock and quinoa in medium sauce pan. Bring to a simmer over medium/low heat. Reduce to low and simmer for 10-15 minutes (until all stock has been absorbed) with the lid on.
5. Add warm quinoa to a large bowl. Toss in lime zest, lime juice, plenty of salt and pepper, and a bit of olive oil. Add cilantro (or parsley). I just tasted it until I liked the combo of salt, pepper, and olive oil. Mix to combine.
6. Lay sliced chicken breasts on top of quinoa and serve.

You can also whip up a creamy avocado sauce to cool down the spice (I didn't try this because I didn't have any avocados, but next time I definitely will). Mix flesh of an avocado with 2 tbsp Greek yogurt and drizzle on top!

I served this with a salad and yogurt.  Hope you enjoy it as much as we did!

Tuesday, November 13, 2012

Mexican Pizza

This is a recipe from Trader Joe's website, adapted slightly. I love this recipe because you can be as creative as you want with it. If you like Taco Bell's Mexican Pizzas, you're going to LOVE these!!!

Mexican Pizza

Mexican Pizza
(Makes 2)

1/2 lb ground beef or ground turkey
1 medium onion, diced (I used a little less)
1 clove garlic, minced
1 tbsp chili powder
1 tsp ground cumin (I'd use a little less of this; the flavor is too overpowering for me)
1/2 tsp paprika
1/2 tsp black pepper
1/2 tsp salt (I'd use just a little more)
4 9" flour tortillas
1 15-oz can refried beans (we used refried black beans!)
1/2 C chunky salsa (or a little less; we used this amount and they came out just a little bit soggy)
2 C 3-cheese blend (we used the Trader Joe's Lite version)
2 green onions, chopped
2 roma tomatoes, diced (I used WAY more because I LOVE tomatoes!)
1/4 C large black pitted olives, sliced (again, I used way more, because my husband loves black olives!)

1. Preheat oven to 350°F.
2. Place meat, onion, and garlic in skillet over medium heat. Cook until beef is evenly browned.
3. Drain off grease.
4. Mix chili powder, cumin, paprika, salt, and pepper in small bowl. Season meat with mixture.
5. Coat 2 pie plates (I used a cookie sheet) with non-stick cooking spray. Place 2 tortillas down and cover with a layer of refried beans.
6. Spread half the seasoned meat over each tortilla, then cover each with a second tortilla. Bake for 10 minutes. Remove from oven and allow to cool slightly.
7. Spread half the salsa over the top tortillas. Top each pizza with half the cheese, tomatoes, green onions, and olives.
8. Return pizzas to oven, bake until cheese is melted, about 5-10 minutes. (I may bake them a little longer next time to crisp them up a little bit.)
9. Remove from oven and allow to cool slightly. Slice each pizza into 4 pieces and serve.

I doubled this recipe and we had a leftover pizza. I just put it in the fridge in foil and we had it the next day... just pop it in the oven for 10 or 15 minutes (or more depending on how crispy you want it) and it's DELICIOUS leftover! I served this with limes and creamy plain yogurt (instead of sour cream) and it was delectable :) Enjoy!!!

Tuesday, October 30, 2012

Baked Spaghetti

This is Paula Deen's recipe (which I adapted just a tad with seasoning), which I found on pinterest. It's delicious and even better leftover! I served with salad; some crusty garlic bread would've been a nice addition :)

Baked Spaghetti

Baked Spaghetti

2 C canned diced tomatoes
2 C tomato sauce
1 C water
1/2 C onion, diced
1/2 cup green bell pepper, diced
2 cloves garlic, chopped
1/4 C fresh parsley, chopped
1 1/2 tsp Paula Deen's House Seasoning (which is 1 C salt, 1/4 C black pepper, and 1/4 C garlic powder)
1 1/2 tsp Paula Deen's Seasoned Salt (I had Lawry's so that's what I used)
1 1/2 tsp Italian seasoning (I just divvied it up evenly between dried oregano, thyme, marjoram, and basil)
1 1/2 tsp sugar
2 small bay leaves (I didn't have any so I left this out)
1 1/2 lbs ground beef
8 oz uncooked angel hair pasta
1 C cheddar cheese, grated
1 C Monterey Jack cheese

1. Preheat oven to 350°F.
2. In stockpot, combine tomatoes, tomato sauce, water, onion, pepper, garlic, parsley, 3 seasoning mixtures, sugar, and bay leaves.
3. Bring to boil over high heat, then reduce heat and let simmer, covered, for 1 hour.
4. Cook ground beef in large skillet over medium-high heat until fully cooked, with no pink color remaining (next time I may season the meat a little for flavor... even without seasoning though, this recipe was tasty).
5. Drain fat from meat (I didn't, but mine was pretty lean to start out) and add meat to stockpot. Simmer for 20 minutes more.
6. Cook pasta according to package directions.
7. Cover bottom of 13x9x12 dish with sauce. Add a layer of pasta then a little less than 1/2 of each cheese.
8. Repeat the layers, ending with sauce.
9. Bake for 30 minutes. Top casserole with remaining cheese and bake for about 5 minutes more, until cheese is melted and bubbly.

Enjoy!!!

Chicken Alfredo Roll-Ups

This dish is fantastic! I got it from the blog Mmm...Cafe, and she also includes her mom's garlic alfredo sauce recipe (see last post) which is delectable... I don't even really like alfredo sauce that much, and I couldn't stop licking the spoon :)


Chicken Alfredo Roll-Ups
serves 3

2 1/2 C alfredo sauce
9 lasagna noodles
oregano
garlic salt
2 C cooked chicken, shredded (I just baked a few breasts with salt and pepper to use)
3 C Mozzarella, shredded

1. Spray 8x8 dish with non-stick spray and pour 1/2 C alfredo sauce, or just enough to cover bottom, into dish.
2. Boil 8-10 C water in large pan and cook lasagna noodles until al dente (you may want to cook a couple extra since they tend to break and tear during rolling.)
3. Drain and RINSE WITH COLD WATER TO PREVENT NOODLES FROM STICKING TO EACH OTHER (don't skip this step)!
4. Lay out each noodle and blot dry with a paper towel.
5. Over each noodle, spread about 2 tbsp alfredo sauce (don't use too much or it'll get messy fast). Sprinkle on some oregano and garlic salt. Take 1/9 of shredded chicken and spread evenly over each noodle. Top each with 3 tbsp cheese.
6. To roll noodles, start at one end and roll the noodle over the toppings (it may help to lift the noodle a little as you roll to prevent toppings from squishing out.)
7. Place rolls in dish, seam sides down. Pour remaining alfredo sauce over the top. Top with remaining cheese. (I had a couple extra so I just layered them on top with more alfredo sauce. If you do this, be sure to spread a little sauce between the layers as well.)
8. Bake at 350°F for 25-30 minutes, until cheese on top is completely melted.

I served with salad with balsamic vinegar dressing and a large bowl of plain Greek yogurt to cut through the delicious greasiness (this isn't what I'd call the healthiest meal, but it's worth the occasional indulgence!) Enjoy!!!

Garlic Alfredo Sauce

Here's the alfredo sauce I used for my next post, the Chicken Alfredo Roll-Ups.  It's from the blog Mmm...Cafe, and it's so worth the creamy, cheesy indulgence. Give it a try, even if you're not an alfredo fan; this just may change your mind!

Garlic Alfredo Sauce
Makes 2 1/2 cups

1/2 C butter (I might try using a little less next time; it was pretty oily, but still delicious)
1/2 tsp garlic, minced
2 oz cream cheese
2 C heavy cream (or 1/2 and 1/2)
2 tsp garlic powder
salt and freshly ground pepper
1/2 tsp dried oregano
2/3 C parmesan cheese

1. In large saucepan, melt butter over medium heat. Add garlic and cook for 1 minute or until fragrant.
2. Add cream cheese and whisk until smooth and melted.
3. Whisk in heavy cream.
4. Season with garlic powder, salt, pepper, and oregano.
5. Bring to simmer, whisking frequently until sauce thickens, about 15 minutes.
6. Stir in cheese and when melted, remove from heat and serve.

This recipe converted me into an alfredo sauce lover! Hope you enjoy it :)

Monday, October 8, 2012

Roasted Asparagus

I got this recipe from Mom, when I called to ask her what to serve with my Garlic Parmesan Chicken and Noodles. It's super quick and super healthy! She told me to buy asparagus spears that are a little thicker (as opposed to the thin, delicate ones you would want for steaming), and they ended up staying nice and juicy.  Sorry, no picture for this one, but when done, they should look just a little browned in spots and still mostly a healthy green color.

Roasted Asparagus

1 bunch of asparagus, not too thin
olive oil
garlic salt and black pepper

1. Preheat oven to 400°F.
2. Toss asparagus spears in olive oil, garlic salt, and pepper.
3. Cover cookie sheet in tin foil and lay out spears 1 layer thick.
4. Bake for 20-30 minutes or so (check after 15 minutes) until slightly softened and tender.
5. Serve warm.

Enjoy!!!

Garlic Parmesan Chicken and Noodles

This recipe (from the Better Homes and Gardens site) is delicious and very easy to prepare.  It truly only takes 45 minutes or so and you get a savory, filling dish!  And it's pretty healthy, aside from the Parmesan cheese :)

Garlic-Parmesan Chicken and Noodles

Garlic Parmesan Chicken and Noodles
Serves 4

6 oz wide egg noodles (I used a little more)
1 2 1/4 lb roast chicken (I bought a prepared one, but it would've been even tastier fresh)
1 C frozen peas
4 cloves garlic, minced
1 3/4 C whole milk (I used some 1% milk and some 1/2 and 1/2)
1/2 slice bread, white or wheat (I used some leftover Panko crumbs and some fine wheat bread crumbs)
3/4 C shredded Parmesan cheese
2 tbsp butter, melted
salt and pepper to taste
snipped fresh thyme, optional (I didn't have any)

1. Preheat oven to 450°F. Bring 6 C salted water to boil in large pot; add noodles and cook until tender, about 10 minutes. Drain.
2. Meanwhile, remove chicken from bones; discard skin and bones and shred chicken. In saucepan, combine chicken, peas, garlic, and milk. Heat through. Cover and keep warm.
3. Process bread into course crumbs in food processor and transfer to small bowl. Add 1/4 C Parmesan and melted butter. Mix.
4. Stir hot chicken mixture and remaining Parmesan cheese into noodles. Heat and stir until bubbly. Season with a little salt and black pepper to taste.
5. Pour entire mixture into casserole dish and top evenly with bread crumb mixture. Bake for 5-10 minutes, until top begins to brown. Top with fresh thyme.
6. Serve warm!

And BAM! You're done! I served this with roasted asparagus spears (recipe courtesy of my mother :)) and plain yogurt.  Enjoy!!!

Sunday, October 7, 2012

Slow-Cooker Barbecue Pulled Pork

This is a fantastic recipe with lots of room for creativity.  It turned out great, but it definitely took a lot of time.  If you're feeling patient, it's a great one to try.  It'd be perfect for game day or tailgating! I got this one from My Daily Dish, and I just modified it with spices that I thought would make it better.


Slow-Cooker Barbecue Pulled Pork
Serves 8-10

1 onion, diced
4-6 lb pork butt or shoulder roast (I used a shoulder roast)
1 can beer (I used Miller Genuine Draft)
garlic powder
1 16 oz bottle barbecue sauce
salt, black pepper, chili powder, cayenne pepper, more garlic salt, and whatever other spices sound good (maybe some paprika?)
small wheat dinner rolls (or whatever bread you want)

1. Place diced onion on bottom of crock-pot.
2. Place roast fat-side up into crock-pot.  Pour beer over all.
3. Sprinkle a little garlic powder on top of the roast to help with the cooking smell.
4. Cook on low for 8-10 hours until roast starts to fall apart.
5. Remove roast and onion from crock-pot and discard liquid from pot.
6. Discard fat and bones from roast and shred pork into pieces (this is the part that took me eons... maybe just because I didn't know the most efficient way).
7. Place pork and onions back into crock-pot and pour barbecue sauce over it. Add all additional spices as desired.
8. Cook on high for 1 hour or low for 2-3 hours (I did high for just under an hour... probably the longer you do it, the better the flavors will mingle, so I recommend trying low for 2 or 3 hours if you have time).
9. Serve warm on rolls (we made them into sliders!)

I served these with a salad, potato chips and applesauce.  Enjoy!!!

Greek Yogurt Chicken

This recipe is so delicious and healthy! I found it on pinterest (originally at megnificentlife). It literally took me less than 45 minutes to make dinner, it was so easy! I served this chicken with boiled corn on the cob and some spectacular mashed potatoes and gravy (all courtesy of my husband :))


Greek Yogurt Chicken

4 boneless skinless chicken breasts
1 C plain Greek yogurt
1/2 C parmesan cheese, grated
1 tsp garlic powder
1 1/2 tsp seasoned salt
1/2 tsp pepper

1. Preheat oven to 375°.
2. Combine yogurt, cheese, garlic powder, seasoned salt, and pepper in a bowl.
3. Line baking sheet with foil and spray lightly with cooking spray.
4. Coat each chicken breast in yogurt mixture and place on foiled baking sheet.
5. Bake for 45 minutes.

That's it!!! It's that simple! Enjoy :)

Wednesday, October 3, 2012

Mom's Corn Chowder

My mom told me about this recipe she made the other night, so I decided to give it a try.  She's a VERY creative cook and she just came up with this herself; she told me she sort of combined a few recipes to make it.  It's delicious on a cool Fall evening and easy enough even for me to make :)

Mom's Corn Chowder
Makes 3-4 big bowls

1 onion, chopped small
3-4 garlic cloves, minced
4 celery stalks, chopped small
2-3 ears of corn, with corn cut off the cob
1/2 - 3/4 stick of butter, cut into a few chunks
2 cans chicken broth (I used 1 can chicken and 1 can vegetable; real stock would be better :))
1-2 potatoes, peeled and sliced
salt and pepper to taste (I added no salt, but tons of black pepper)
1 C milk
1 tbsp flour

1. Combine onion, garlic, celery, and corn in casserole dish.  Top with butter and cover.
2. Microwave for 5 minutes, remove and stir. Repeat twice more (for a total of 15 minutes cooking time).
3. In the meantime, combine broth and potatoes in large pot. Cook/boil until potatoes are cooked through, 15-20 minutes or so.
4. Add cooked corn mixture to broth mixture and season as desired. Taste to see that everything's cooked the desired amount. If not, simmer for awhile longer.
5. Whisk together milk and flour. Add to chowder, stir, and simmer for a couple of minutes until desired thickness is achieved.
6. Serve hot!

This recipe would be GREAT with some crusty bread... I served it with turkey sandwiches on wheat kaiser rolls because my man likes his meat :) A salad would've been great too!!! I wish I had a picture of this, hopefully next time I'll remember to snap one and share.  Mom, if you have anything to add or change, PLEASE comment!!!

Thursday, September 27, 2012

Vanilla Pudding Parfaits

I've had this recipe laying around for so long that I don't even remember where I originally got it... but it's so delicious and creamy as a dessert. I've made it for the 4th of July many times; instead of putting it in a parfait glass, I layer everything in a casserole dish and then decorate the top with blueberries and strawberries.  You can really do whatever you want with it, just try it! It's fabulous and it's super quick and easy!!!


Vanilla Pudding Parfaits

8 oz cream cheese, softened
1 1/2 C COLD milk
3.4 oz vanilla instant pudding mix
1 1/2 C Cool Whip
1 box (24) vanilla wafer cookies, crushed or 1 box (2 packs) graham crackers, crushed
1 1/2 C berries or fruit (or more, I always add more :))

1. Beat cream cheese until creamy; gradually beat in milk.
2. Add pudding mix and mix well. Whisk in 1 C Cool Whip.
3. In tall parfait glass (or any dish), put 1 layer of crushed vanilla wafers or graham crackers. Follow with a layer of fruit, then a layer of Cool Whip mixture.
4. Repeat layers until done, then top with a spoonful of Cool Whip and some more fruit or berries.

Enjoy!!!

Wednesday, September 26, 2012

Black Bean Enchiladas

I just made these tonight and they turned out fantastic! VERY flavorful and tons of room for creativity too.  They can be made in the crock-pot or in the oven*.  I used the crock-pot and they were a little bit soggy, but still delicious.  I was thinking maybe next time I could do them in the crock-pot, so they can have all the flavor-mingling that makes them so tasty, then transfer them to a casserole dish and put them in the oven for a few minutes just to crisp them up. I got this recipe from pinterest, originally from theKitchn.

2010-09-15-Enchiladas1.jpg

Black Bean Enchiladas
Serves 4-6

1/2 yellow onion, diced small
1/2 bell pepper, diced small
1 16-oz can black beans, drained and rinsed
1 C frozen corn (I used fresh corn on the cob from the local farmer's market and stripped off the kernels :))
2 tsp chili powder (more if you want it hotter!)
1 tsp cumin
1 tsp salt (I'd add a little more next time; I had to add some salt once it was on my plate)
1 C leftover meat of any kind (optional) (shrimp may be delicious too!)

1 1/2 C cheese, shredded (I used cheddar, Monterey Jack would be delicious; I used about 2-2 1/2 C)
2 16-oz jars salsa
12 6"-8" tortillas (I used some of each because that's what I had)

1. In medium bowl, mix together onion, pepper, beans, corn, spices, meat, and 1/2 C cheese.
2. Pour about a cup of salsa (half a jar) into bottom of slow cooker and spread around evenly.
3. Scoop about 1/2 C of bean mixture into a tortilla, roll it up, and nestle it in bottom of crock-pot. Repeat, rolling and nestling tortillas until bottom of crock-pot is covered.
4. Spread another cup of salsa over this layer and sprinkle with another 1/2 C of cheese.
5. Create a second layer of filled and rolled tortillas (I did a couple more layers). Top with another layer of salsa, but reserve cheese for final, top layer until towards the end of cooking time.
6. Place lid on crock-pot and cook on HIGH for 2-4 hours.
7. In last 15 minutes of cooking, sprinkle reserved cheese over top and let it melt.
8. Serve enchiladas with salsa and limes!

*To cook in oven, layer rolled tortillas in 9x13 baking pan and cover with aluminum foil. Bake at 400°F for 20 minutes. Uncover, sprinkle with cheese, and bake uncovered for an additional 5-10 minutes.

We had these with a salad... there's lots leftover, so we'll enjoy them again tomorrow... actually my husband just informed me that he'll be having them for a late-night snack since South Park starts again tonight :)
Enjoy!!!

Tuesday, September 25, 2012

Dijon Chicken Linguine with Mushrooms

I found this recipe on pinterest (originally from Rock Recipes), and tweaked it more to my liking.  It was tasty and SUPER quick (it took me under an hour to prepare AND cook, which if you knew me would be shocking).  I love mushrooms, but to be honest, the thought of cooking with them is oddly disgusting.  It was worth it though :) My mushrooms went mostly bad between the time I bought them and when I made this, so I ended up using way fewer than what it calls for.  Next time I'll do it right.  I served it with a salad and a glass of wine :)

Dijon Chicken Linguine with Chanterelle Mushrooms and Toasted Almonds

Dijon Chicken Linguine with Mushrooms
Serves 4

3 tbsp olive oil
4 boneless, skinless chicken breasts
4 cloves garlic, minced
salt and pepper to season
4 oz white wine (I used one of those single-serving Sutter Home Chardonnays that I already had)
2 C heavy whipping cream (I ended up using about 1 1/4 C because I didn't buy enough)
3 tbsp Dijon mustard
1 C mushrooms (smallish ones)
fresh linguine, cooked
1/2 C toasted slivered almonds (I didn't have any and I forgot to buy them so I didn't use them)

1. Heat olive oil in large frying pan over medium-low heat. Add chicken breasts and garlic; season with salt and pepper.
2. Continue frying chicken until it's completely cooked. Remove from pan and hold in warm oven.
3. Add white wine to frying pan and simmer until volume is reduced by half.
4. Add whipping cream and mustard and season with salt and pepper.
5. Simmer until sauce thickens enough to coat a metal spoon. Return chicken to sauce, add mushrooms, and simmer for 2 more minutes.
6. Serve over cooked linguine. Sprinkle with toasted slivered almonds.

Next time, I'll try it with the almonds; I'm sure it alters the taste of the dish :) Enjoy with salad and a glass of wine! Also, a nice crusty bread may have been good :)

Sunday, September 23, 2012

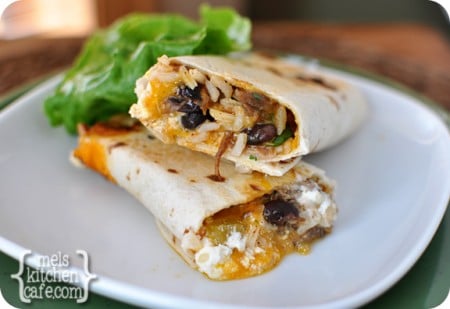
Crispy Southwest Chicken Wraps

This recipe speaks for itself... it's relatively healthy, looks delicious, takes little time to make, and tastes amazing! I used leftover chicken, but you can substitute in any meat. This ones originally from mel's kitchen cafe.


Crispy Southwest Chicken Wraps
Makes 4-6 wraps

1 C cooked rice
1/2 tbsp chili powder
1 tsp ground cumin
1/2 tsp garlic salt

1 C chicken, cooked and shredded (or other leftover meat)
1 can black beans, drained and rinsed
1 green onion, finely sliced
1/2 red or green pepper, diced
1/4 C fresh cilantro, chopped (I used way more than this because I LOVE cilantro; see Chicken Salad recipe for tips on chopping herbs)
juice of 1 lime
2 C shredded cheese
6 flour tortillas (I used smallish ones because they're easier to handle; this'll make more wraps, too)
cooking spray or olive oil
sour cream (optional, I served them with plain yogurt on the side instead)
limes for garnish

1. Mix rice together with chili powder, cumin, and garlic salt.*
2. Add chicken, beans, onion, pepper, cilantro, and lime juice.
3. Sprinkle cheese over tortillas, leaving a border around edges, then arrange chicken and rice mixture down the center of each tortilla.
4. Roll stuffed tortillas, leaving edges slightly open. Spray the seams lightly with cooking spray (I brushed with olive oil instead).
5. Slightly flatten wraps with palm of hand.
6. Heat non-stick skillet or griddle over medium heat for 1 minute. Arrange wraps, seam-side down, in pan and cook until golden brown and crisp, about 2-3 minutes per side (I did them a couple at a time and only about 1-2 minutes on each side). Seams should seal somewhat since you oiled them.
7. Transfer to plate and serve warm.

*A word about the rice: I cooked it Persian-style (long-grain rice in boiling slightly salted water until almost done,  drain, lightly cover bottom of pan in oil, put rice back in gently, wrap lid of pan in small tea towel, cover pan and cook on low heat for awhile until fully cooked; Mom, PLEASE correct me if I'm wrong) then added all the spices.  This made the most delicious Spanish-style rice I have ever tasted! I ate a bunch of it plain while I was cooking :)

I served these wraps with TONS of limes, plain yogurt, and sliced ripe avocado on the side :) We couldn't stop eating them! Hope you enjoy them too!

Chicken Pot Pie (or is it meat pie?)

This recipe for chicken pot pie is tremendous.  It's perfect for a cool fall day, and even my husband, who traditionally hates pot pies, devoured it and became a pot pie lover! Really, I'm not sure if this is a true pot pie.  My mom says (based on the Pennsylvania Dutch traditions) that pot pies are actually crustless on the outside and have sort of dumplings mixed in throughout.  She describes meat pies as the ones with a bottom and top crust, which is what this is. Regardless, it's delectable!

I got this one from pinterest (original source is BookCooking.)


Chicken Pot Pie (Meat Pie)

1 lb boneless, skinless chicken breasts, cubed (about 2 breasts halves)
1 C carrots, sliced
1 C frozen green peas
1/2 C celery, sliced
1/3 C butter
1/2 C chopped onion
1/3 C all-purpose flour
1/2 tsp salt
1/4 tsp black pepper
1/4 tsp celery seed
1 3/4 C chicken broth
2/3 C milk
2 unbaked pie crusts, 9"

1. Preheat oven to 425°F.
2. In saucepan, combine chicken, carrots, peas, and celery. Add water to cover and boil for 15 minutes. Remove from heat, drain, and set aside.
3. In saucepan over medium heat, cook onions in butter until soft and translucent. Stir in flour, salt, pepper, and celery seed. Slowly stir in chicken broth and milk.
4. Simmer over medium-low heat until thick. Remove from heat and set aside.
5. Place chicken mixture in bottom pie crust (I used a deep-ish casserole dish, not a pie pan). Pour hot liquid mixture over it. Cover with top pie crust, seal edges, and cut away excess dough. Make several small slits in top to allow steam to escape.
6. Bake for 30-35 minutes, or until pastry is golden brown and filling is bubbly.
7. Cool for 10 minutes before serving.

You may also want to cover the edges in foil to prevent them from burning... I did. This is a messy meal and it won't look perfectly symmetrical, but it's delicious :) Serve with LOTS of black pepper on top and a tall glass of milk!  A rainy day outside rounds this meal out perfectly! Enjoy :)

Rustic Twice-Baked Potato Casserole

This is delicious and can go with so many things! Again, I got this from pinterest (originally from The Yummy Life). This one I served with the Bourbon Street Chicken.


Rustic Twice-Baked Potato Casserole
Makes 18-20 servings (I basically cut this recipe in thirds, and we had leftovers)

5 lbs russet potatoes, baked (~12 C when chopped, so I baked about 6 small ones and had 4 C chopped)
3/4 C Greek yogurt (I used Mountain High because that's what I had on hand)
1/4 C milk
1/2 C grated Parmesan cheese
8 oz sharp cheddar cheese, grated and divided
3/4 tsp dry ground mustard
3/4 tsp garlic powder (or 2-3 minced garlic cloves)
1/4 tsp onion powder (I forgot to buy this so I just used a little more garlic powder)
1 1/2 tsp salt
1 tsp ground black pepper
1 or 2 dashes cayenne pepper (optional)
1 C green onions, chopped and divided

1. Preheat oven to 400°F and bake potatoes for 50-60 minutes, until soft when squeezed (poke holes in them first).
2. Remove and let cool completely.
3. Preheat oven to 350°F. Chop cool baked potatoes, skin on, into 3/4" cubes and add to large bowl.
4. In small bowl, combine yogurt, milk, Parmesan cheese, 1/2 C cheddar cheese, dry mustard, garlic powder, onion powder, salt, pepper, cayenne pepper, and 3/4 C green onions. Stir until combined.
5. Pour mixture over potatoes and toss until mixed.
6. Transfer to sprayed 9x13" clear baking dish (I used a casserole dish that wasn't clear and it worked out fine). Sprinkle remaining cheddar cheese on top. *At this point, you can stop, cover the dish, and refrigerate it for a day in advance. Remove from fridge a half hour before baking.*
7. Bake uncovered for 45-55 minutes, until lightly browned on top and edges/bottom are visibly well-browned.
8. Remove from oven and sprinkle remaining green onions on top.

We had leftovers so the next morning, I fried them in a little bit of olive oil with some shredded prosciutto (which I had leftover from the Roast Cod recipe; that prosciutto is expensive, don't let it go to waste!) for flavor.  I topped it with a little more shredded cheese and served it with scrambled eggs for breakfast! Delicious! I hope you enjoy it as much as we did :)

Bourbon Street Chicken

I just made this one last night and served it with the Rustic Twice-Baked Potato Casserole.  I didn't make rice with it, but next time I probably will, either that or make some sort of pasta or something.  I served it with plain yogurt and applesauce on the side :) This one I found on BigOven.com. It's perfectly sweet (which I'm usually not a fan of) AND spicy, so it was a good balance for me :) Also, weird, but there's no actual bourbon in this version.

Bourbon Street Chicken

Bourbon Street Chicken
Makes 4 servings

2 lbs boneless, skinless chicken breasts, cut into bite-size bits
1 tbsp olive oil
1 garlic clove, crushed (I used 2 because we love garlic)
1/4 tsp ginger
3/4 tsp crushed red pepper flakes
1/4 C apple juice
1/3 C light brown sugar
2 tbsp ketchup (with some Sriracha sauce mixed in, maybe about a tsp if you like it hot!)
1 tbsp apple cider vinegar
1/2 C water
1/2 C soy sauce
1 tbsp cornstarch (if thick sauce is desired)

1. Heat oil in large skillet and add chicken pieces; cook until lightly browned.
2. Remove chicken from skillet. Add remaining ingredients into skillet, heating over medium heat until well blended and dissolved.
3. Add chicken back in and bring to a hard boil.
4. Reduce heat and simmer for 20 minutes or so, uncovered.
5. Serve over hot rice.

Enjoy!

Saturday, September 22, 2012

Chicken Salad (With Cilantro and Lime!)

This is THE BEST chicken salad ever! We had it in wheat tortillas, kind of as wraps, or as loghmehs, as we Persians call it :) It's REALLY easy, and I just used leftover chicken breast from the night before and shredded/chopped it for this recipe. I got this one from pinterest, but it's originally from Becoming Betty's blog.


Chicken Salad

chicken, cooked and shredded (I used leftover breasts)
avocado
mayo (a teensy bit only)
green onion, sliced
cilantro, chopped up
fresh lime juice
salt and pepper to taste

(Pardon the lack of measurements here... this is normally something that would immediately cause me irreparable panic and send me running from the kitchen, not to return for a good month or so. But I'm slowly becoming braver in there, and since almost all of these ingredients are things that I wish I could add to nearly every recipe I try (avocado, green onion, cilantro, and lime are heavenly), I went for it.  It was TOTALLY worth it and I encourage you to try it too!)

Just add all the ingredients together and mix it up.  If you love avocado, add more; if you don't care for onions, put less; you get my point. Go really easy on the mayo; the lime juice gives it a nice texture, so lots of mayo isn't really necessary, and it's healthier without it.  To easily chop the cilantro (or any herbs), put a bunch in a glass measuring cup and use scissors to cut it up until it's the size you need (this is how my mom chops all her herbs :)) I used TONS of lime juice and a good amount of cilantro and plenty of salt and pepper.  It was delicious! Hope you enjoy it :)

Friday, September 21, 2012

Roast Cod with Garlic Butter

I just made this one for dinner tonight... the cod was delicious, but the garlic butter was INCREDIBLE. I'll be putting it on all kinds of things now, seafood and otherwise!  This recipe is super quick; I'm notorious for taking forever to prepare a meal and this took me under half an hour. I served this with baked sweet potatoes and steamed broccoli :) (This one's originally from Coastal Living.)

photo credit: Becky Luigart-Stayner

Roast Cod with Garlic Butter
Makes 4 servings

1/4 C unsalted butter, softened
1 1/2 tbsp chopped flat-leaf parsley
1 large garlic clove, peeled and minced
2 tsp minced shallots (green onions)
1/2 tsp Dijon mustard
1 1/2 tbsp minced prosciutto di Parma
1 tbsp almond, rice, or all-purpose flour (I used all-purpose)
2 tbsp freshly squeezed lemon juice
salt, to taste
freshly ground pepper, to taste
2 tbsp canola oil
4 skinless cod fillets (I made only 2, but I still made a lot of the butter :))
lemon wedges for garnish

1. Stir together first 10 ingredients in small bowl. Set aside.
2. Heat oil in a wide, deep, ovenproof skillet over medium-high heat. Season the cod fillets with salt and pepper and cook 4 minutes. Turn fillets over and cook 1 more minute.
3. Spoon 1 tbsp butter mixture over top of each fillet and transfer skillet to oven.  Bake at 450°F for 2 minutes or until fish is just cooked through and opaque in center. (I don't have cookware that's ovenproof to 450°, so I ended up transferring the fillets to a small casserole dish for this step.)
4. Add remaining butter to pan (or casserole dish) and let melt, stirring with juices in pan.  Spoon over fish and garnish. Serve immediately.

Enjoy!!!

Pho Ga (Chicken Noodle Soup)

I found this recipe on pinterest too... Pho in restaurants is amazing, so I was definitely skeptical about trying it at home, especially considering my infamous track record when it comes to cooking.  But I went for it and it turned out great; it also left some room for creativity with herbs and stuff.  I guess "pho" just means rice noodles and "ga" means chicken, so this is really just chicken noodle soup, Asian style :) Use enormous bowls and chopsticks to make it tastiest :)


Pho Ga
Serves 4-6

Broth
10 C (2 1/2 L) chicken stock or 4-5 stock cubes dissolved in 10 C water (I used prepared stock)
1/2 fresh chicken (I used 2 chicken breasts instead)
1 cinnamon stick (I used a few dashes of cinnamon because that's what I had on hand)
4 green onions, cut into lengths
1 inch fresh ginger root, peeled and bruised
2 tsp sugar
1 tsp salt
2 tbsp fish sauce (NewAsianCuisine.com recommends Three Crabs brand; I couldn't find that brand though)

1. Bring chicken stock, chicken, cinnamon, onions, ginger, sugar, and salt to boil over high heat in stockpot.
2. Reduce heat to low and simmer for 45 minutes, skimming off foam and fat periodically.
3. Stir in fish sauce and remove from heat.
4. Remove chicken and set aside to cool.
5. Strain solids from broth and keep clear broth warm over very low heat.

Noodles
10 oz (300 g) dried rice stick noodles or rice vermicelli (I used rice stick noodles)
4 C bean sprouts, seed coats and tails removed, blanched until cooked
1 onion, thinly sliced (I used green onions here)
ground white pepper (which actually smells nauseating, so I'd recommend using black pepper)
cilantro, basil, and mint leaves (or any combination thereof)
limes cut into sections
2 chilis, sliced and deseeded, with soy sauce (or sriracha!!!)

1. Bring pot of water to boil over medium heat. Add dried noodles and blanch until soft (about 5 minutes for stick noodles or 2 minutes for vermicelli). Remove and rinse with cold water, drain.
2. Shred chicken along the grain into thin strips.
3. Place noodles in serving bowls (use HUGE ones if you have them) and top with bean sprouts, shredded chicken, and onions.
4. Pour hot broth into each bowl, sprinkle with pepper, and garnish with cilantro, basil, and mint.
5. Serve hot with limes and chili/soy sauce mixture (or sriracha!!!) on the side.

I served this with TONS of extra cilantro and basil, as well as extra cool bean sprouts. The cinnamon addition sounds weird, but just do it, because it really makes it taste like restaurant pho. I'm not usually the biggest fan of adding cinnamon to cooked food, but it really works here.  Also, serve with extra limes and plain yogurt (always serve everything with extra limes and plain yogurt)! Add plenty of sriracha sauce as you eat it :) A soft drink really hits the spot with this spicy meal (I learned that from my sister :))  Enjoy!!!

Szechuan Chicken

This one was really fabulous and I served it with white rice :) Pasta would probably be good too. (This recipe's originally from the website laaloosh.)

Szechuan Chicken
photo credit: ifood.tv

Szechuan Chicken
Makes 3 servings

Sauce
3 tbsp chicken broth
1 tbsp tomato paste
2 tsp balsamic vinegar
1 tsp brown sugar
1 tsp soy sauce
1/2 tsp sesame oil
1/4 tsp cornstarch
1/2 tsp ground coriander
1/4 tsp black pepper
1/2 tsp crushed red pepper (I used a little more, 'cause I like things spicy)

Whisk together all ingredients in small bowl.

Chicken
1 lb boneless, skinless chicken breast, cut into bite-size pieces
1 tsp rice wine or dry sherry
1 tsp soy sauce
1 1/2 tsp cornstarch
3 cloves garlic, minced
1 tsp canola oil
1 tbsp fresh ginger, minced (I keep fresh ginger root in the fridge and peel a section and grate it as needed)
1 small yellow onion, chopped
1 1/2 C fresh broccoli florets
1/4 C dry-roasted peanuts (I left these out because I'm not a big fan of the spicy + peanuty flavor)
1 red bell pepper, chopped
1 green onion, finely chopped

1. Combine chicken, rice wine (or sherry), soy sauce, cornstarch, and garlic in medium bowl; mix thoroughly.
2. Heat wok or large skillet over high heat. Add oil, then add ginger and onion. Stir-fry for about 30 seconds.
3. Add chicken mixture and cook until chicken begins to brown, about 2 minutes. Continue stir-frying until chicken is lightly browned on all sides, another 1-2 minutes.
4. Add broccoli, peanuts, and bell pepper. Stir-fry for 1 minute.
5. Stir in Szechuan sauce that you made (see above) and stir-fry until chicken is just cooked through and sauce is slightly thickened and glossy, 30 seconds to 1 minute.
6. Transfer to serving dish and sprinkle with scallions. Serve immediately.

I ended up cooking things longer at each step because I was trying to read the recipe and because I'm just plain inept in the kitchen.  The broccoli turned out a little mushy, which I hate.  So just stay on top of the time.  I served this with a huge dollop of plain yogurt on the side because this dish is SPICY (also, because I serve plain yogurt with almost every meal :)).  Enjoy!

Banana Oatmeal Muffins

I found this recipe for banana muffins on pinterest (originally from this blog) and decided to give them a shot.  They are DELICIOUS with a little cream cheese for breakfast! And they're healthy! It's my new go-to recipe for when I have too many over-ripe bananas (gag me) :)

Banana Oatmeal Muffins
Makes 12 muffins

2 1/2 C old-fashioned rolled oats (NOT the quick cooking kind)
1 C plain low fat Greek yogurt (I used Mountain High instead because that's what I had on hand.)
2 eggs
3/4 C sugar
1 1/2 tsp baking powder
1/2 tsp baking soda
3 bananas (or maybe 4, if you like a strong banana flavor)

1. Preheat oven to 400°F. Spray tin with cooking spray (apparently, paper muffin tin liners don't work well with this recipe, but foil ones do. I just used cooking spray.)
2. Place all ingredients in blender and blend until oats are smooth (add oats a little at a time then add liquids; stir a few times throughout).
3. Divide batter among wells and bake for 20-25 minutes, or until toothpick comes out clean (I baked them a bit shorter because my oven is weird; watch them carefully).

I halved this recipe and it worked fine, but I did put in 2 bananas (what are you going to do with the leftover half of a black slimy banana anyway) and the muffins tasted perfectly banana-ey.  I definitely wouldn't use less than 3 bananas for a full recipe, maybe even go to 4.  I hope you enjoy them! :)

Seasoned Tilapia

I love fish and this looked like a quick and easy recipe (originally from jujugoodnews)... it turned out really good and it's super simple.


Seasoned Tilapia
Makes 4 servings

1/4 C extra virgin olive oil
3 cloves garlic, minced or pressed (I minced it)
1 tsp paprika
1 tsp ginger
1 tsp fresh ground black pepper
1 tsp dried mustard
1 tsp oregano
1 tsp chili powder
1 pinch cayenne pepper (I used more because I like it spicy)
4 tilapia filets, thawed

1. Preheat oven to 400°F. Line baking sheet with parchment paper.
2. Combine olive oil, garlic, and all spices.
3. Dip each filet in seasoned oil and place on baking sheet.
4. Pour remaining oil over filets and place in oven.
5. Bake for about 10 minutes.

Enjoy!!! We had it with steamed broccoli :)

Ok, here goes nothing...

I'm completely new to blogging and the idea of my words being put down on paper (or screen) and read by people I don't know is a little disconcerting (clearly I'm not a writer), which I think makes me an unlikely blogger candidate.  But, it's always sounded fun, and I think it can help me accomplish a few goals, so here goes!

First of all, I'm trying to stay organized.  I love to crochet, I've recently started sewing, and I'm a newlywed with embarrassingly little cooking experience and a new apartment :)  I'm hoping I can blog patterns, recipes (lots of recipes), cleaning tips, and decorating ideas that I try or want to try... this'll keep them all handily together and organized for future reference.

Second, I hope this blog can eventually be useful and inspirational for others. I'm on pinterest a lot and I can tell you that at least half the brilliant ideas I find on there link directly to some creative person's blog.  So maybe one day, Beautiful Morning will encourage someone else who's trying desperately to figure out what to make for dinner!

Anyway, thanks for reading this and I hope this blog ends up fun and creative instead of boring and dull, which is how my writing compares to that of my sister's (check out her blog at www.howhappyisthelittlestone.blogspot.com if you want to laugh, cry, and snort at each and every post!)