Wednesday, March 12, 2014

Lemon Blueberry Yogurt Muffins

I got this recipe from Lovely Little Kitchen. It makes a HUGE batch of muffins, so I ended up freezing half of the batter for later, but "later" will probably come sooner than I anticipated! These muffins are moist and flavorful, and the fruits you put in are fresh! It's hard to eat just one :) And the streusel topping is so yummy, it's hard not to eat it right off the top!


Lemon Blueberry Yogurt Muffins
makes at least 24 muffins

Streusel Topping
5 tbsp COLD cubed butter
just under 1 C flour (the original recipe calls for 1 C, but I found that to be a little too much)
1/2 C sugar

1. Pour flour, sugar, and COLD, cubed butter into medium bowl. Using knife or forks, but the butter into the flour/sugar mixture until you have pea sized crumbs.

Muffins
3 C flour
1 tsp baking powder
1/2 tsp baking soda
1/2 tsp salt
1 C vegetable oil
1 1/2 C sugar
2 eggs
1 C yogurt
zest of 1 lemon (or a little more!)
2 tbsp fresh lemon juice (or a little more!)
2 C blueberries

1. Preheat oven to 350°. Line muffin tin with paper liners.
2. In medium bowl, mix flour, baking powder, baking soda, and salt. Set aside.
3. In large bowl, blend sugar, oil, and eggs on medium speed until smooth.
4. Add yogurt, lemon zest, and lemon juice and blend until well-combined.
5. Gradually add the flour mixture on low speed and mix until flour is incorporated.
6. Gently fold in the blueberries.
7. Scoop the batter into the muffin cups, filling each one about 2/3 full.
8. Top each muffin cup with ~1 tbsp of the streusel topping.
9. Bake for 22-26 minutes, or until they just begin to turn golden brown on top.
10. Remove the muffins from tin to allow them to cool.

Serve with a glass of milk and enjoy!!!

Garam Masala

Garam Masala, I learned when attempting my first Indian dish, Chicken Masala, is essentially a mix of spices often used in the making of Indian cuisine. You can buy this stuff, supposedly, but most of the ingredients I already had on hand and anyway, I like to make my own spice mixes as often as possible, so I found this recipe and gave it a whirl. Although I'm no Indian food connoisseur, I think it turned out great. I got this recipe from allrecipes.com.

Garam Masala

1 tbsp ground cumin
1 1/2 tsp ground coriander
1 1/2 tsp ground cardamom
1 1/2 tsp black pepper
1 tsp ground cinnamon
1/2 tsp ground cloves
1/2 tsp ground nutmeg

Mix all spices together in a bowl and store in airtight container in cool, dry place.

It's that simple :) And I'm scared of cumin, so I usually add less than what it calls for, but I would advise to use the full amount for this recipe.

Try it with the delectable Chicken Masala recipe! Enjoy!!!

Chicken Masala

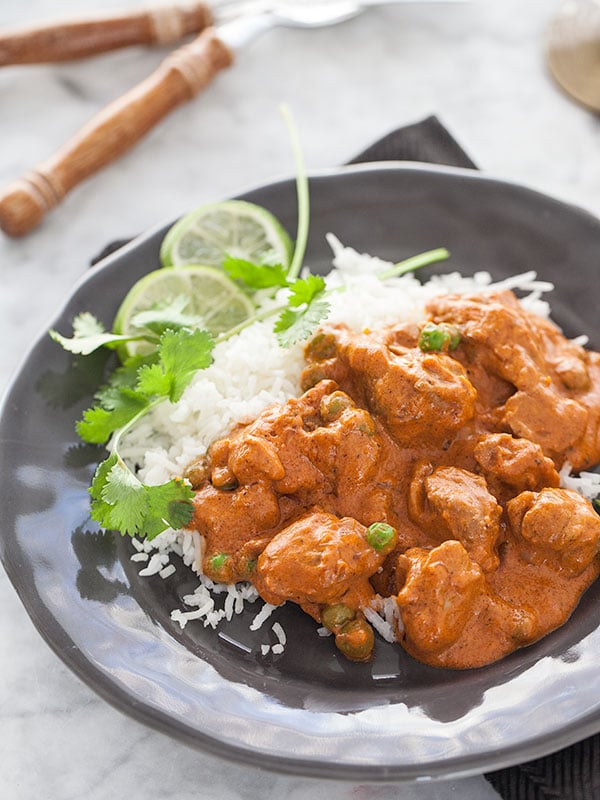
I was really apprehensive to even attempt this recipe; my husband and I are both pretty adventurous when it comes to trying new foods, but even we had only recently tried Indian food, at an actual Indian restaurant, for the first time. We absolutely loved it, of course, but when I came across this recipe, I didn't feel quite ready to attempt it myself, in my own kitchen. It sounded so good though, that I finally gave in, and with many mental disclaimers, gave it a shot. I adapted this recipe slightly from the Indian Butter Chicken I found on foodie crush, and it turned out FANTASTIC. One word of advice; don't be shy about the spices... I added a little less than what it called for because I was nervous mine would turn out a hot mess, but it was actually ever so slightly blander than we would have preferred. So spice away!!!

Indian Butter Chicken

Chicken Masala
serves ~4

2 tbsp vegetable oil, divided
2 tbsp butter, divided
1 onion, diced
3 tsp garam masala (a mix of Indian spices that you can whip up yourself pretty quick)
1 tsp ground ginger
1 tsp chili powder
1 6-oz can tomato paste
1 C tomato sauce
1 bay leaf
2 C cream (or 1/2 and 1/2)
1 lb boneless chicken breasts, cut into 1-inch pieces
salt and pepper
1 C frozen peas, defrosted
lim and cilantro leaves for garnish

1. In a large, high-sided skillet, heat 1 tbsp oil over medium heat. Add 1 tbsp butter and onion and cook for 3-4 minutes or until onions are translucent.
2. Add garam masala, ground ginger, and chili powder and cook for 2 more minutes, stirring.
3. Stir in tomato paste, tomato sauce, and bay leaf and cook for 2 more minutes.
4. Add cream, bring to a boil, reduce to simmer, and cook for 5 minutes. {Now take a deep breath! This is the first moment you can really step away from the stove without fear of burning everything to a crisp!}

5. Season chicken with salt and pepper. Add remaining 1 tbsp oil and 1 tbsp butter to a large skillet over medium-high heat and add chicken. Cook for 4-5 minutes, until chicken is lightly browned on all sides.
6.Transfer chicken to tomato cream sauce and simmer for 10-15 minutes or until chicken is cooked through.
7. Add peas and cook until peas are warmed through.
8. Serve over white rice and garnish with lime wedges and cilantro leaves.

Next time, I'll add more chili powder or cayenne pepper, because it was hardly spicy at all and we like it hot! Again, don't skimp on the garam masala, even though it seems pungent. I served this with a huge dollop of plain yogurt on the side to cut the spice. Enjoy!!!

(Note: This would probably be DELICIOUS as a vegetarian dish as well; just add whatever veggies you like best instead of chicken. I'm thinking mushrooms, broccoli... the options are endless!)

Tuesday, March 4, 2014

Chocolate Sour Cream Bundt Cake

I made this for our Valentine's Day dessert, with purple and pink sugar sprinkled on top. The glaze kind of forms a shell of chocolate on top and makes the whole thing taste like a delicious cross between a cake, a brownie, and a chocolate doughnut. It's beautiful, but most importantly, it's rich and delectable! Serve with a TALL glass of cold milk :) (This recipe's from two peas & their pod.)

chocolate-sour-cream-bundt-cake1

Chocolate Sour Cream Bundt Cake

Cake
1 C unsalted butter, plus more to grease the pan
1/3 C Dutch processed cocoa powder (which I couldn't find quickly, so I used regular cocoa powder)
1 tsp salt
1 C water
2 C flour, plus more for the pan
1 3/4 C sugar
1 1/2 tsp baking soda
2 eggs
1/2 C sour cream
1 tsp vanilla

1. Preheat oven to 350° and position rack in center.
2. Butter and flour a 10- or 12-cup bundt pan and set aside. (I don't think I did this part very well because once my cake was cooled and I tried to flip it out of the pan, the top layer just peeled away and the bottom layer remained in the bottom of the pan. I'm still trying to master the technique, but I think part of the secret is to grease and flour your pan very thoroughly! Don't worry though, my cake may have been off kilter, but it was still delicious :))
3. In a small saucepan, combine butter, cocoa powder, salt, and water over medium heat. Cook, stirring, until just melted and combined. Remove from heat and set aside.
4. In a large bowl, whisk together flour, sugar, and baking soda. Add half the butter mixture and whisk until completely blended (mixture will be thick). Add remaining butter mixture and whisk until well-combined.
5. Add eggs, one at a time, and whisk until completely blended.
6. Whisk in sour cream and vanilla, mixing until smooth.
7. Scrape batter into bundt pan and bake until toothpick comes out clean (40-45 minutes). Allow to cool in pan for 15 minutes, then invert onto cooling rack. Let cool completely before glazing.

Glaze
4 oz bittersweet chocolate, finely chopped
1 1/2 tbsp corn syrup (or agave nectar)
1/2 C heavy cream
1 1/2 tbsp sugar

1. Place chopped chocolate and corn syrup (or agave nectar) in medium bowl and set aside.
2. In small saucepan, over medium heat, combine heavy cream and sugar. Stir until cream is hot and sugar is dissolved.
3. Pour hot cream over chocolate, whisking until smooth.
4. Generously drizzle over cooled cake, allowing it to drip down the sides.

There is absolutely nothing healthy about this cake, but it tastes incredible!!!

Enjoy!

Creamy Tomato and Spinach Pasta

I tried this recipe once last week and we've had it twice since then, adapted to what we have on hand! It's that good! It's really pretty basic, but it's a little bit different than a regular red spaghetti sauce in that it's a little bit creamier. You can use whatever pasta you have on hand, and other than some chopping, it whips up really quick for a weeknight dinner! I found it on Inspired Dreamer.  Oh, and, it's a one-pot dish pretty much, so you can make and serve without dirtying up your whole kitchen!


Creamy Tomato and Spinach Pasta

1 tbsp olive oil
1 small onion, chopped
2 cloves garlic, chopped
*(ground beef, if desired; I tried it both ways and both were fantastic)
1 15-oz can diced tomatoes (I used about a pound of fresh tomatoes, cut into bite-sized pieces)
1/2 tsp dried oregano
1/2 tsp dried basil
a pinch (or more, depending on your preferred level of spiciness) of red pepper flakes
pepper to taste
1/2 tsp salt
2 tbsp tomato paste
2 oz cream cheese (I used a dollop of heavy cream instead one time, because that's all I had)
1/4 C grated Parmesan (I used asiago once, a little less than called for)
1/2 lb penne (again, twice I also used regular spaghetti and added the sauce to it on the plates)
1/2 9-oz bag fresh spinach (optional)

1. Cook onion and garlic in olive oil over medium heat in a skillet until transparent and softened (about 5 minutes). I used a cast-iron skillet.
2. Add tomatoes (with juices), oregano, basil, red pepper flakes, pepper, and salt. Stir to combine and cook on low until tomatoes are slightly smashable with wooden spoon and mixture is juicy.
3. Add tomato paste and 1/2 C water to skillet and stir until paste is incorporated into sauce.
4. Turn heat to low. Cut cream cheese into a few pieces and add to skillet, stirring with whisk until cream cheese has melted in (alternately, pour in a dollop of heavy cream and whisk in; you don't need much, just a tbsp or two).
5. Add Parmesan (or asiago) and whisk in until melted.
6. Add spinach and gently stir into sauce until wilted (about 3-5 minutes). Taste and adjust salt and pepper if needed.
7. Add pasta, cooked al dente. Stir and serve. (Or pour over any other al dente pasta you choose and serve.

*You can make this sauce with ground beef as well. If you choose to, just brown some with the onions and garlic at the beginning and continue as described above.

Really, you can be very creative with this basic recipe as well. I still want to try the sauce with mushrooms and other veggies to see how it is!

This sauce was also amazing leftover. I just made new pasta, reheated the sauce, mixed the two together in a large bowl, and served with some cheese on top. Goes great with a salad and a glass of wine! Enjoy!

Southwestern Chopped Salad with Cilantro Lime Dressing

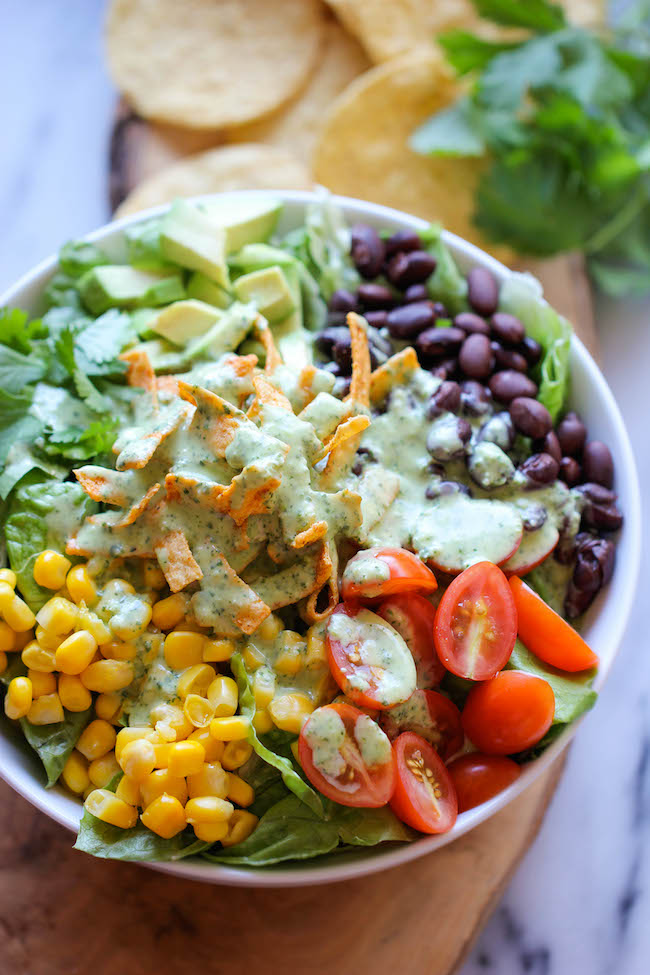
Here's another incredible recipe I found and adapted from Damn Delicious. Again, you can be totally creative with this recipe (read, use pretty much whatever you have around and leave out what you don't) AND the cilantro lime dressing is to die for! I had leftover, so I used it the next day and I make it regularly for other salads, too.

Southwestern Chopped Salad with Cilantro Lime Dressing - A tex-mex style salad with an incredibly creamy Greek yogurt cilantro dressing!

Southwestern Chopped Salad with Cilantro Lime Dressing
serves 2

Salad
5 C romaine lettuce, chopped a little (I used spinach)
1/2 C cherry tomatoes, halved
1/2 C corn kernels
1/2 C black beans (if they're canned, drain and rinse first)
cooked beets, cut into bite-sized pieces
anything else that sounds yummy!
2 tbsp fresh cilantro, chopped
1 avocado, chopped
1/4 C tortilla strips, for garnish (optional)

In individual bowls, layer all ingredients except for tortilla strips. Toss to combine. Pour dressing on top, toss again, and garnish with tortilla strips.

Cilantro Lime Dressing
1 C loosely packed cilantro (I think I used more, because I adore cilantro)
1/2 C plain yogurt
2 cloves garlic
juice of a lime
pinch of salt
1/4 C olive oil
2 tbsp apple cider vinegar (which I left out because it didn't seem to need it, but I may try next time)

Combine all ingredients except for olive oil and apple cider vinegar in bowl of food processor. Process, then, with motor running, slowly drizzle in olive oil and vinegar until emulsified.

Ta-da!!! You have a quick, easy, delectable, and completely healthy meal! It'd be great to take to work as well.  Enjoy!

Slow Cooker Black Bean Soup


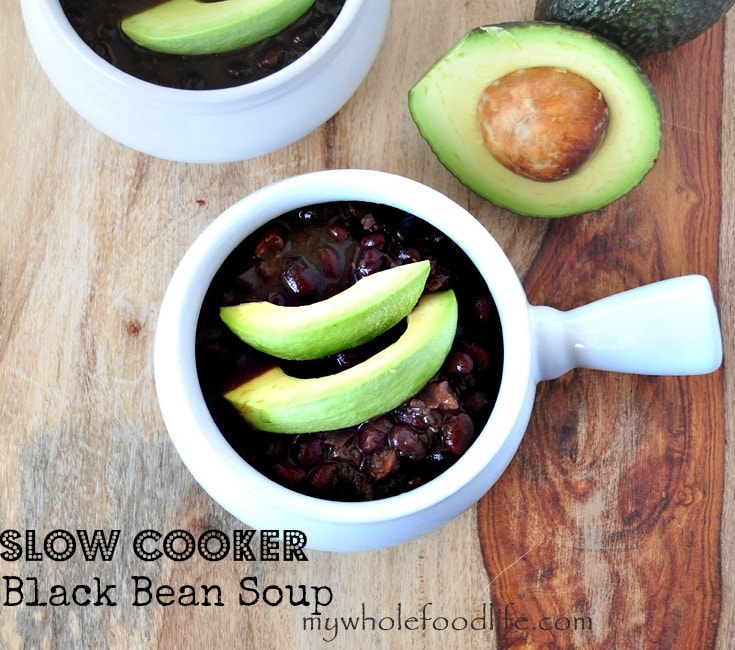
I got this recipe from My Whole Food Life and adapted it just slightly. It takes literally minutes to put together, but it took me twice as long to make it as it should, which I'll explain in the directions, but next time it should go a lot more smoothly. It tasted wonderful when it was finally made and it was perfect for a freezing Winter day here in Wisconsin! This recipe makes an enormous batch, so we had leftovers for a couple of days, too, which always makes me happy because leftovers are my absolute favorite food!

Black Bean Soup - My Whole Food Life 1

Slow Cooker Black Bean Soup

4 C dried black beans, soaked overnight, rinsed, and drained)
4 C vegetable broth
1 yellow onion, diced
1 tsp chili powder
1 tsp cumin (I used WAY less, like maybe 1/4 tsp)
1/2 tsp oregano
3 cloves garlic, diced
salt, to taste

The original directions say to put all ingredients in the crock pot, cook on high for 1 hour, then cook on low for 3-4 hours. I did that and the beans were NOWHERE NEAR cooked. They were still hard as rocks. So I don't know if it's my crock pot or what, but I ended up refrigerating it for the night and resuming cooking, for the entire rest of the next day, until the beans were finally cooked. The texture was definitely different, but the flavor was exquisite.

So next time, I'm thinking I need to cook the beans part way on the stove after soaking and draining them and then using them in this recipe.

Other than the fact that this dish took me way too long to make, it's a really great recipe and one that we'll definitely have again!

Spicy Parmesan Shrimp Pasta

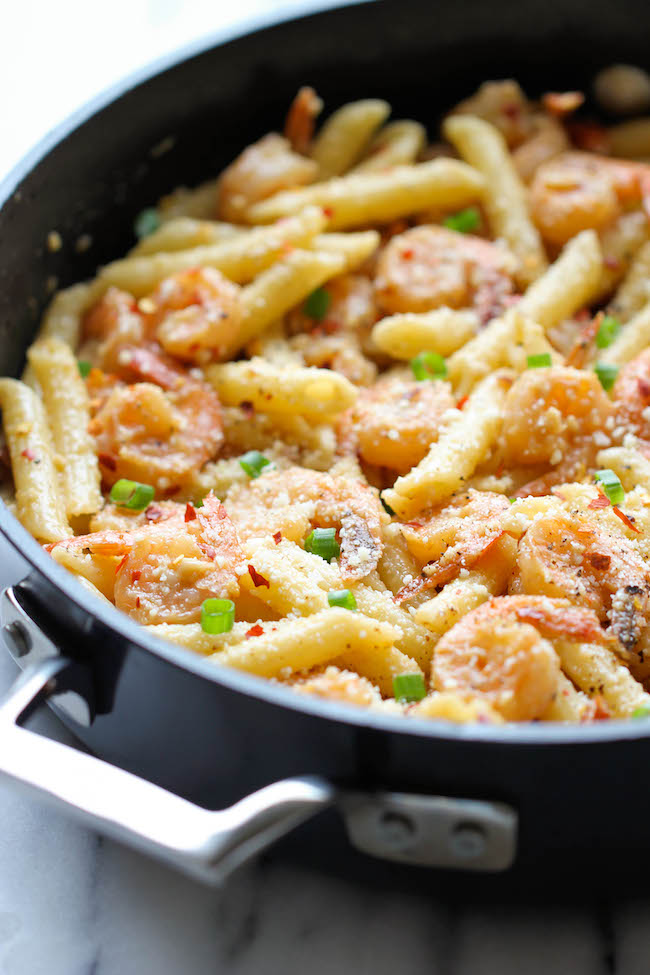
I made this delicious pasta for our romantic Valentine's Day dinner. It is VERY flavorful, and you can adjust the level spiciness to your liking. It's from Damn Delicious and I'll be making it pretty much anytime shrimp is on sale! It's so simple... the longest parts are marinating the shrimp (which I did overnight) and cooking the pasta. Actually cooking up the dish took about 10 minutes in my cast iron skillet. I used fresh shrimp that had already been de-veined and my (very understanding) husband kindly volunteered for the job of shelling them. Although it took him only a few minutes, so next time, maybe I'll be brave enough to take on that gross job :) Serve with a salad and a glass of red wine (or Trader Joe's sparkling grape juice for this preggo)!

Spicy Parmesan Shrimp Pasta - So flavorful, so spicy and so easy to put together, perfect for those busy weeknights!

Spicy Parmesan Shrimp Pasta
about 4 servings

1/3 C olive oil
1/4 C Parmesan cheese
4 cloves garlic, minced
1 tbsp brown sugar
2 tsp soy sauce
1/2 tsp red pepper flakes (we used more because we like it spicy)
1 lb medium shrimp, peeled and de-veined
8 oz penne pasta
salt and pepper, to taste
1 green onion, thinly sliced

1. In medium bowl, whisk together olive oil, cheese, garlic, brown sugar, soy sauce, and red pepper flakes.
2. In a gallon ziploc bag, combine shrimp and olive oil mixture. Marinate for at least 30 minutes (we did it overnight and the flavor was AMAZING), turning the bag occasionally.

3. In a large pot of boiling salted water, cook pasta al dente and drain well.
4. Heat a large skillet (cast iron is what I used) over medium heat. Add shrimp and sauce mixture and cook, stirring occasionally, until shrimp is pink (it takes less than 5 minutes).
5. Stir in pasta and gently toss to combine. Season with salt and pepper.
6. Serve immediately (I served it directly in the cast iron skillet), garnished with Parmesan and green onions.

Enjoy!!!